A Start-to-Finish Guide to Creating Rhinestone Template in Canva
The secret to a great design isn't just patience (though you need that too!); it's a solid plan. A template is the best way to map out complex designs, test color combos, and ensure your final product is flawless. This tutorial will walk you through the entire process, from measuring your item to building the digital grid.
Follow along with the video or use the step-by-step instructions below to get started!
What You'll Need
-
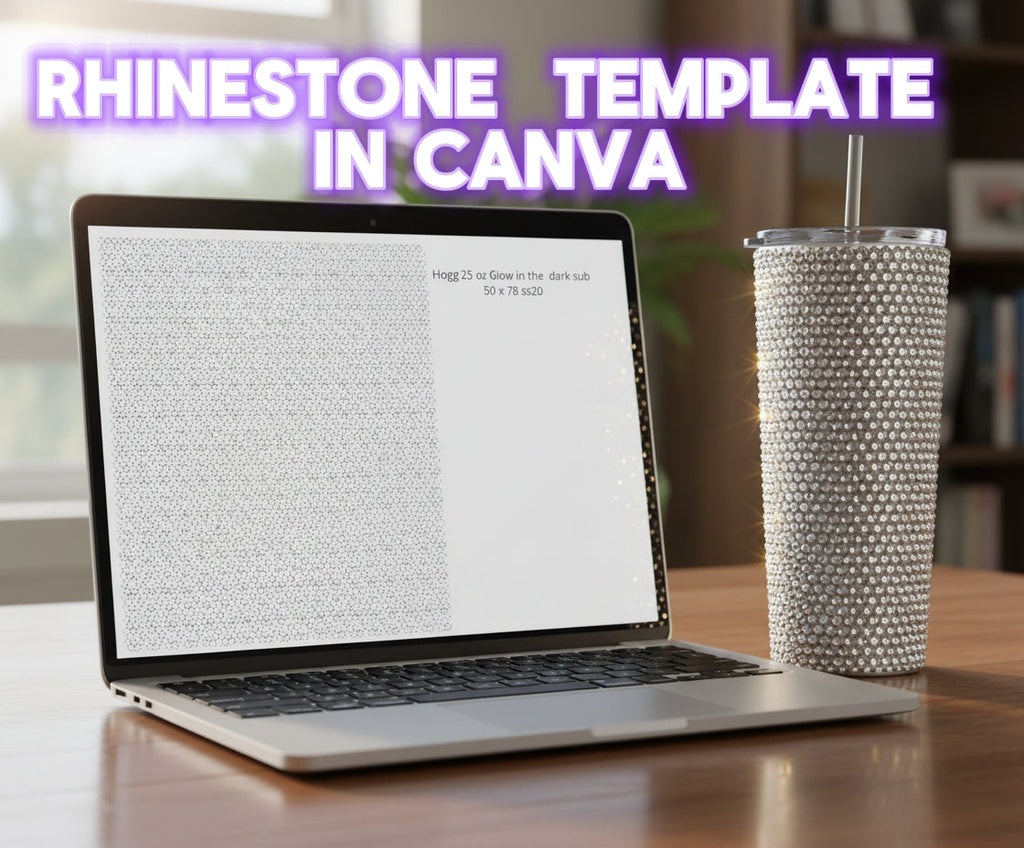
Your Tumbler/Item: The star of the show! The video features a Hogg 25 oz Glow in the Dark Sublimation Tumbler.
-
Rhinestone Measuring Tape: This is the key to an accurate template. We're using the ss20 strips. Download the measuring tape HERE.
-
A Canva Account: A free account works perfectly.
Step 1: Get Your "Magic Numbers" (Measuring the object)
Before you can build your template, you need to know exactly how many stones (we're using SS20) fit on your cup/object. You'll need two measurements: the width (circumference) and the height (rows).
1. Find Your Width (Circumference):
-
Take your horizontal SS20 measuring tape and wrap it snugly around the top rim of your tumbler.
-
Find the "1" on the tape. To avoid your stones overlapping, look at the very last number before the "1" begins.
-
On this 25 oz Hogg tumbler, that number is 50. This means we can fit 50 stones around the cup.
2. Find Your Height (Rows):
-
Now, use your vertical SS20 measuring tape. This will tell you how many rows will fit from top to bottom.
-
Place the tape at the top edge where your first row will sit and run it straight down to the bottom.
-
This template is for the "honeycomb method" (where rows are offset). The tape shows that from top to bottom, we can fit 78 rows.
Our magic numbers are 50 x 78. Now, let's go digital.
Step 2: Build Your Template in Canva
This is where we turn those numbers into a visual grid.
-
Start a New Design: Log in to Canva and click "Create a design." The size doesn't matter, so you can just pick Facebook Post, letter, poster or any other preset.
-
Add Your First "Stone": On the left-hand menu, go to "Elements" and search for "circle." Click a simple, free circle with an outline to add it to your canvas. Resize it to be fairly small.
-
Create Your First Row (Width = 50):
-
Click your circle and hit the "Duplicate" icon (or Ctrl+D/Cmd+D).
-
Drag the new circle right next to the first one.
-
Pro-Tip: To work faster, duplicate your circles until you have a row of 10. Group them together. Now, you can just duplicate that 10-circle group five times to get your 50-stone row.
-
Once you have 50 circles in a perfect row, select all of them and click "Group." This is now your master row.
-
-
Build the Honeycomb Grid (Height = 78):
-
This is the most important part! Click your 50-stone row and duplicate it.
-
Drag this new row just below the first one, but offset it. You want the circles of the second row to sit in the gaps of the first row, just like a honeycomb.
-
Select both offset rows and Group them.
-
Now you have a 2-row block. Keep duplicating this block to build your height.
-
Efficiency Tip: Duplicate your largest group to reach your total of 78 rows.
-
-
Finalize and Group:
-
Once you have 78 rows, select everything on the page (Ctrl+A or Cmd+A).
-
In the toolbar, click "Position." Find the "Space evenly" section and click "Vertically." This cleans up any minor gaps, making your grid perfect.
-
With everything still selected, click "Group" one last time. This may take a moment for Canva to process.
-
You now have a single, massive group of 3,900 circles (50 x 78) that represents your entire tumbler.
Step 3: Export and Use Your Template
Your template is built! The last step is to save it.
-
Add a text box to your design labeling the template (e.g., "Hogg 25oz Tumbler, 50x78 SS20").
-
Click the "Share" button in the top-right corner.
-
Select "Download."
-
Choose "PNG" as the file type and click "Download."
That's it! You can now save this PNG file to your computer, airdrop it to your iPad, or upload it to your drive. Open it in a digital art app (like Procreate) to color in the circles and plan your masterpiece, stone by stone.
Use the comment section below to ask any questions, share your results or offer suggestions.
Happy blinging!
-
Posted in
Tutorials

